The video to audio (MP3) conversion and the "How Tos" on swapping between media formats has been a popular question since we got universal access to digitized media. Today there are many video and audio formats. It is considered a useful digital skill if you know how to efficiently transform videos like MP4, MKV, MOV, WebM, and AVI to MP3.
Article Summary
- Several applications on Android, Windows, Mac and Linux exist which allows easy and advanced conversion between media files.
- We picked three apps- Video to MP3 Music Converter, VLC Media Player, and HandBrake and demonstrated how they can be used to convert Video and Audio formats.
- We also dive into several popular video/audio formats and key consideration for media conversion.
There is also a question about switching between various video files like AVI to MP4 or MOV to MP4. Besides the format changes other complexities include managing video and audio bitrates, switching codecs (H.264/H.265), navigating framerates and downscaling video for playback optimization. Follow this guide as we explore all these variables and figure out how you can take full control of your media collection.
Table of Contents
Tools for Video/Audio Conversion
First things first, you do not need experts to convert between media formats. You just need an expert software or application to do it. There are many available. Some are free, and some are paid. Some have ads and some don’t. All of them are geared towards helping people convert between media formats and editing media (like cropping out parts and reducing framerates/resolutions). We also do not need a specialized hardware to do it. Your mobile phone, tablet or your laptop, desktop can do it seamlessly.
Our pick of free audio/video conversion software and applications are listed below:
| Tool | Platform | Features | Best for |
|---|---|---|---|
| Video to MP3 Music Converter | Android | Simple | Quick Mobile Conversions |
| VLC Media Player | Windows, Mac, and Linux | Medium | Fast, multi-platform conversions |
| HandBrake | Windows, Mac, and Linux | Advanced | Detailed encoding control |
The Process of Video/Audio Conversion
Depending upon your choice of platform and the complexity of conversion pick a tool out of the three listed above. Choose Video to MP3 Music Converter if you are looking for offline and on-the-go video to mp3 translation using your Android mobile device. Pick VLC Media Player if you are on your desktop/laptop and want to convert between audio and video formats or change video formats, quality and compression. Pick HandBrake if you need an advanced video transcoding tool to change video codecs and adjust quality to reduce file size.
Now let us take a detailed look at them one by one.
Video to MP3 Music Converter - Android Application
This is our product. A simple Android application that takes in a video and pushes out an MP3 music file. There’s just one customization option that is to crop out the parts from the beginning and the end. This feature is geared towards music enthusiasts who want to chop out the blank audio parts which are usually in the beginning and at the end of music videos. Other than that, this simple application takes in any video files like MP4 and produces an MP3 audio format. It takes any other video wrappers and formats like MOV, WMV, and AVI. The output is always an MP3. So, it is just for the music and using it on your playlists.
Here are the detailed steps to use Video to MP3 Music Converter application to convert any video to MP3 music:
- Install the Application on your mobile device.
From the Google Play Store for Android devices, download and install this free application.
- Access the Application from your App drawer.Just a tap on the app icon (as seen above) and it will launch our application quickly.
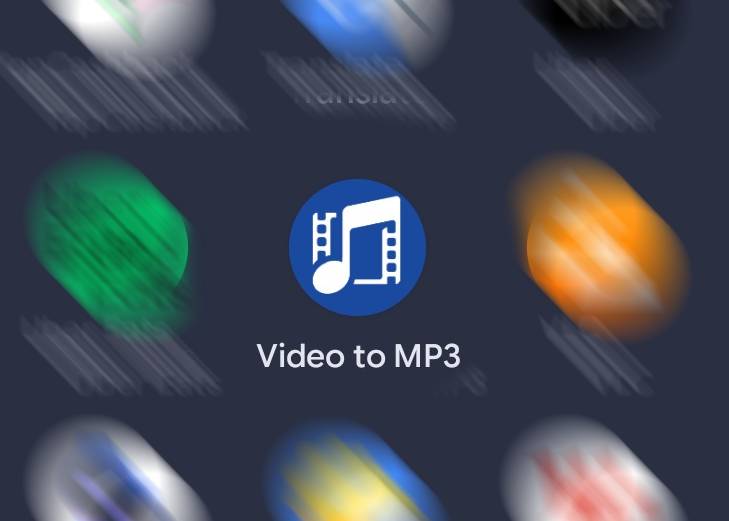
- Select Video to convert.
Tap on the select video button, locate and open the video to convert to mp3 on your device. You must check on the video and hit Done.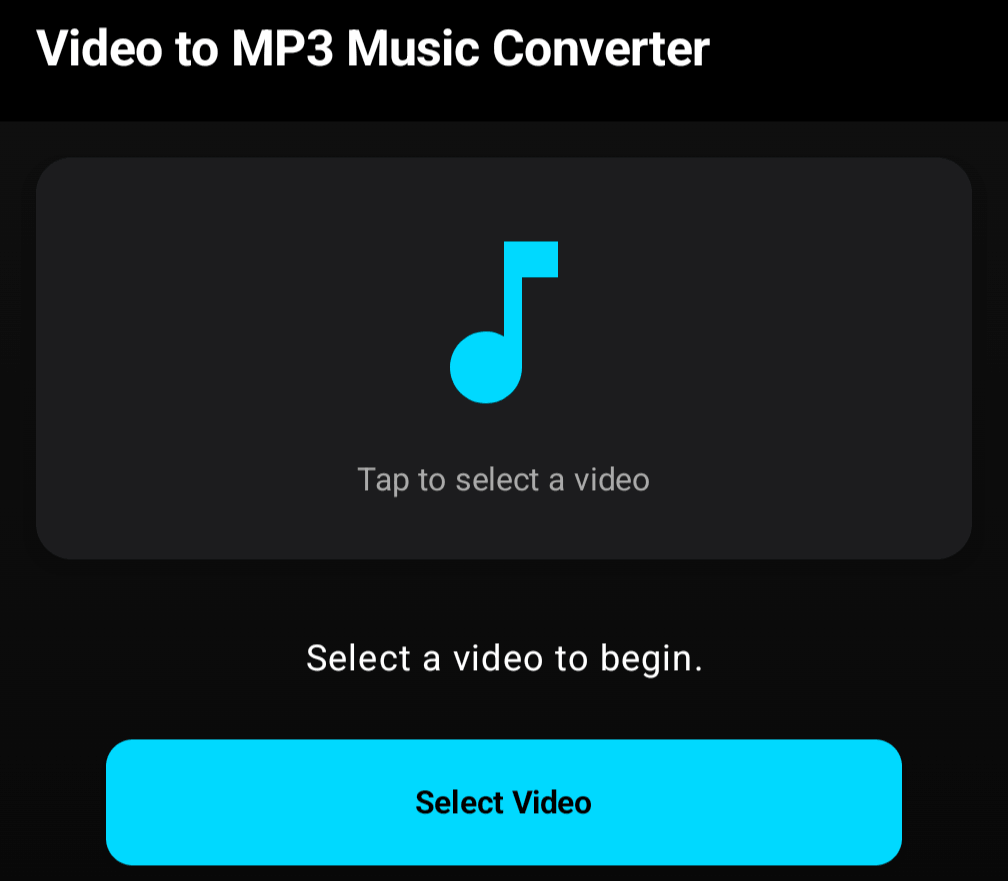
- Optional: Crop the video if required.
Drag the slider from the beginning and the end of the video to select an appropriate part of the video to convert. Preview the selected portion before proceeding.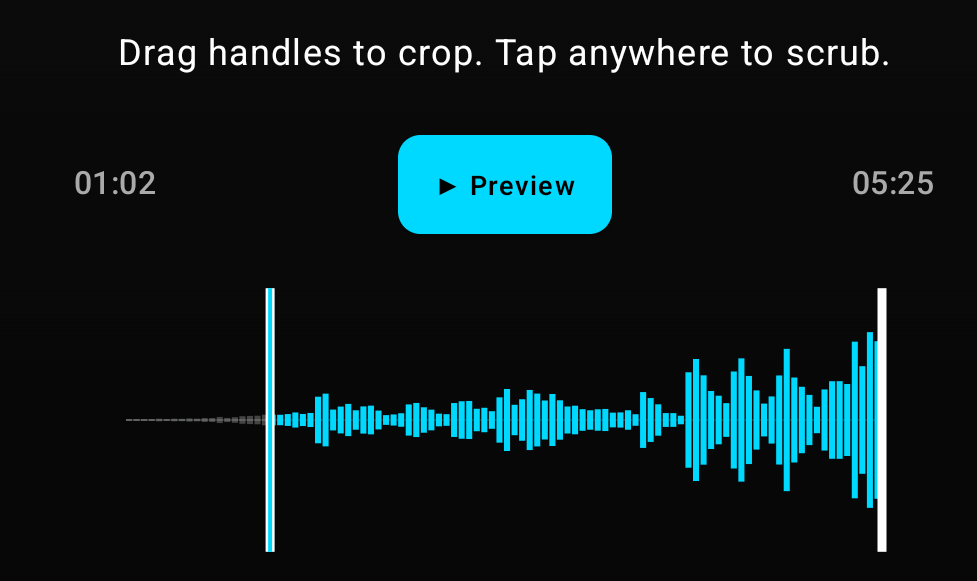
- Convert to MP3. Press this button and it will start the process instantly.
The app will say converting for a few moments. After successfully changing to MP3, the screen will display a conversion complete message. You can open the song instantly or even share it.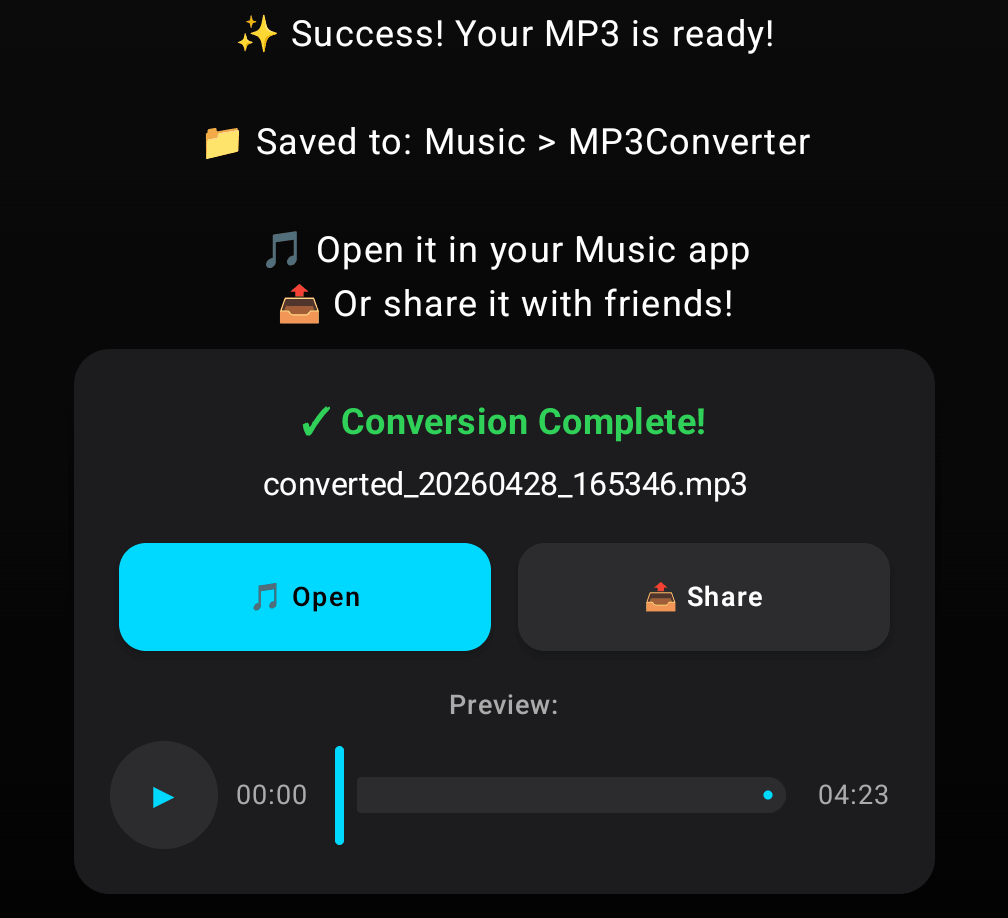
Your music player application will be able to open this song instantly. If you are not satisfied with let’s, say the cropped part, you can further customize the edges and repeat the process again from the same screen. That is all there is to it. Install and open the application, open the video in the app and convert. The output will be a crisp sounding low-space consuming universally recognized MP3 file.
VLC Media Player
If you are in the business of playing digital music, then it is highly likely that you have heard about VLC Media Player. It is the number one software for playing video and music in all sorts of devices. It is a player that is available for Mac, Windows, and Linux along with mobile devices powered by Android as well as iOS (iPhone and iPad). It is our favourite media player because of how it plays almost everything thrown at it. One day, I dragged an image on the application, and it was able to open it too.
Download VLC Media Player from Here
Besides playback, this application can do a lot more. One of those things is converting video and audio to different formats. It can swap between video formats like AVI to MP4. It can also convert video to audio like MP4 to MP3. It is an absolute powerhouse. So, VLC can fulfil the needs of converting video to audio (MP3) and between all media formats. Please note that only the desktop/laptop application can handle the media file conversions.
Here are the steps that you need to follow to convert between different media formats using VLC Media Player:
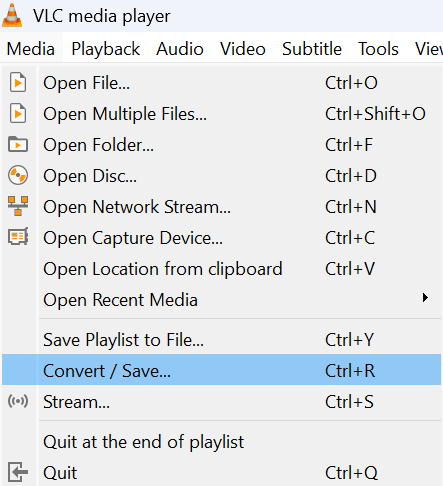
- Open VLC, click on Media > Convert/Save [CTRL + R].
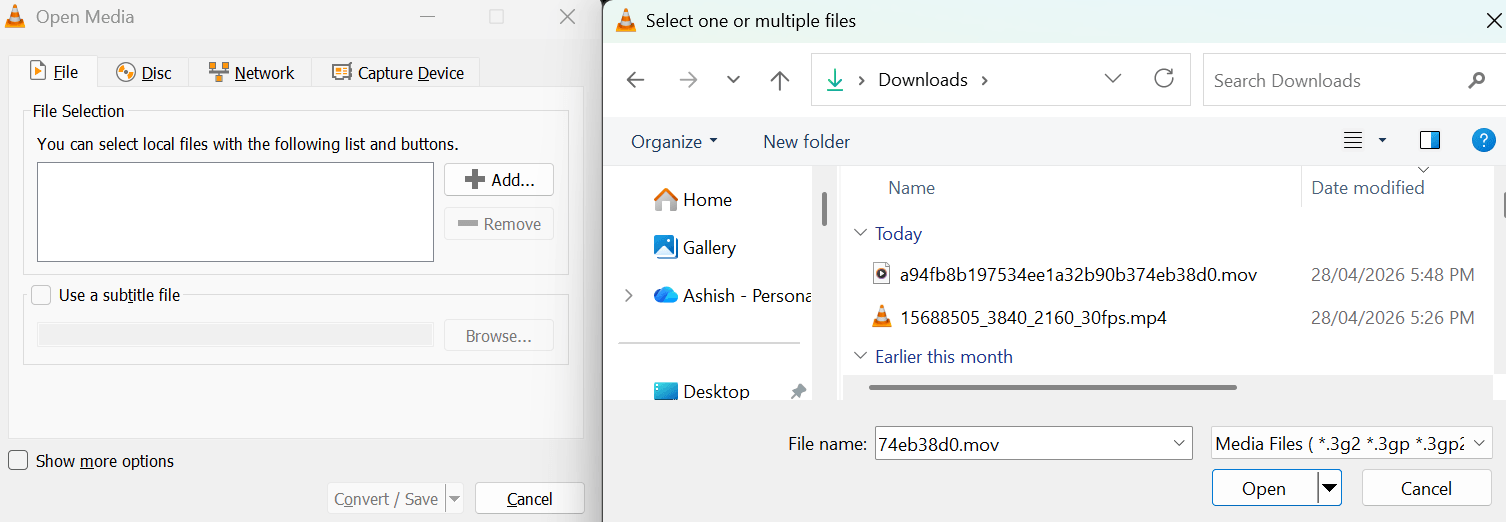
- Click Add to browse and locate the media you want to convert, on the File tab of the open media screen.
You can always add multiple video/audio file. For simplicity try with one file the first time.
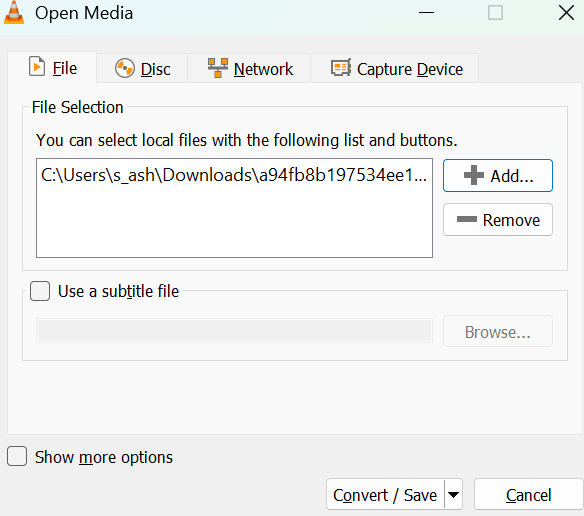
- Press on the Convert/Save button once the media is opened/listed on the screen.
There will also be other buttons like Enqueue, Play, and Stream buttons. Be sure that you are pressing on Convert/Save. There is also a show more options checkbox which allows you to (a) choose the start and stop time (to crop the media) and (b) play another media alongside it so that videos + audio can be mixed up. Most people won’t use these additional features. Our priority is to convert between formats.
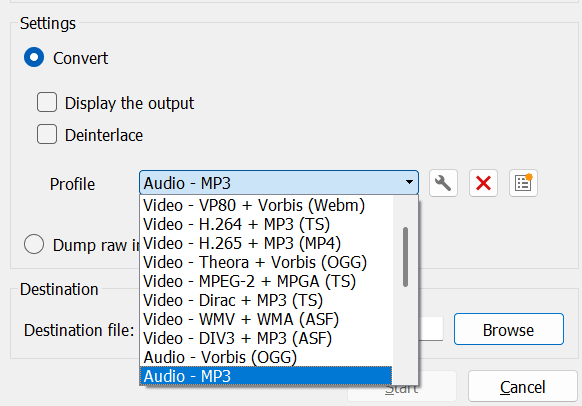
- Choose your target file type like Audio – MP3 in Profile dropdown menu.
Make sure that the Convert radio button is selected. You can also click the wrench icon to edit the current conversion profile or create a new profile. There you can select the (a) Encapsulation like MP4, (b) Video Codec like H-265 (along with bitrate, quality, frame rate), (c) Audio Codec like MP3 (along with bitrate, channels and sample rate), and (d) Subtitles to overlay subtitles. These are advanced options if you want to customize your target file to the finest details. For most of us, the preloaded Profile would be enough.
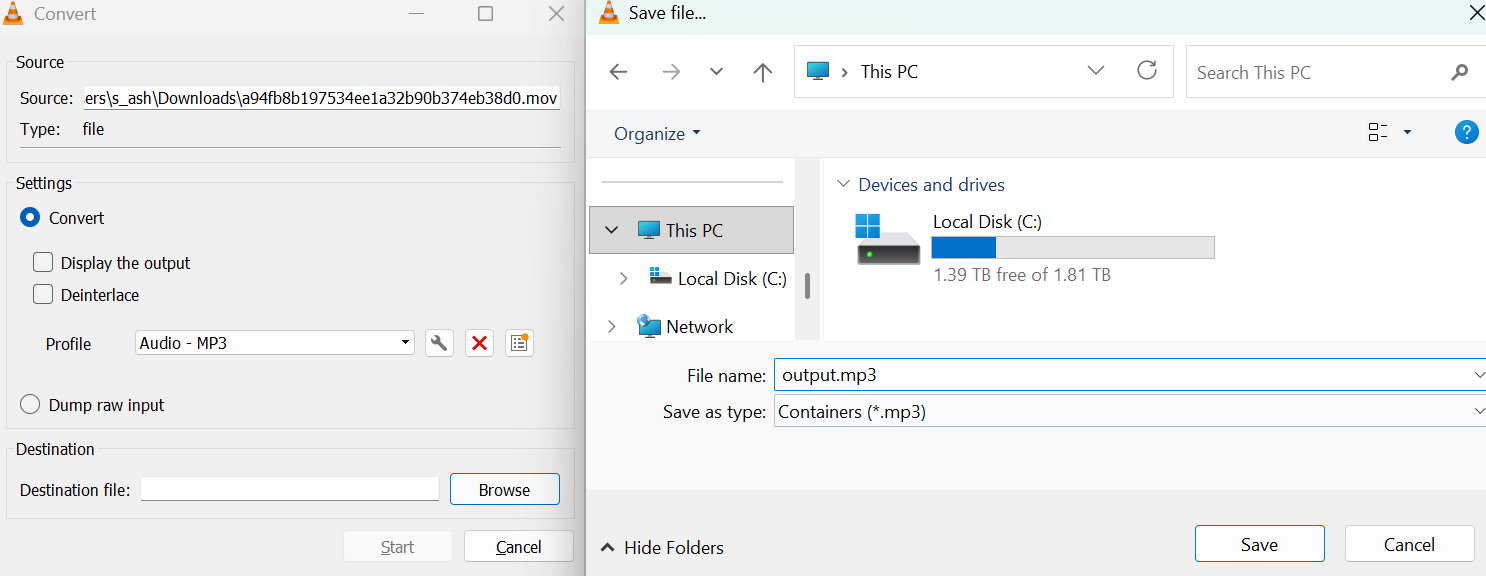
- Browse and choose your destination file location and name
This allow you to pick a location in your computer where the file is stored.
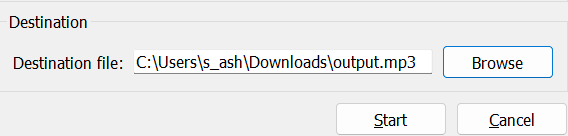
- Hit Start and the Conversion process will begin.
If everything works on your favor, the seek bar on vlc will move to indicate the progress of the conversion process.
You will find the converted file in the location that you chose. Be wary that many users might not be able to get the output they required. VLC is one of the options and if the conversion doesn’t work for you try our one of the other two options.
HandBrake - For Advanced Conversion
Now, we are moving on to one of the most advanced tools in media conversion: HandBrake. It is a free and open-source tool. If you are looking for high quality, smooth, and advanced video and audio conversion, then Handbrake is the answer. With HandBrake, you open a single file or a folder for batch conversion. This software supports many inputs including DVD and BlueRay sources with chapters, multiple viewing angle and audio. The output that this application produces are all modern media containers, video and audio encoders, and several pass-thru options. There are so many options which are enough to make a media conversion enthusiast drool. Not everyone needs all the options. However, people with basic needs can still stick to the basic options in this desktop app.
Note: When I tried it on my Windows PC, it asked for .NET 10.0 Desktop Runtime which I had to download. It was quick and easy installing this requirement from Microsoft. The application is available for Windows PCs, Macs and Linux Distros. There is also a command line version.
Once downloaded, you can open a single media or a folder containing multiple media files. You can choose the output format: MP4, MOV, MKV, and WebM. These are all video containers. The format is displayed below like H.264, 30 FPS. There are several customizations which allows you to change the dimension/resolution, add filters (like Deinterlace), change video encoding (like H.265, MPEG-4), and change audio encoding (like AAC). You can also edit the chapters and subtitles if your video has those.
Here are the detailed steps to convert between all media steps using HandBrake:
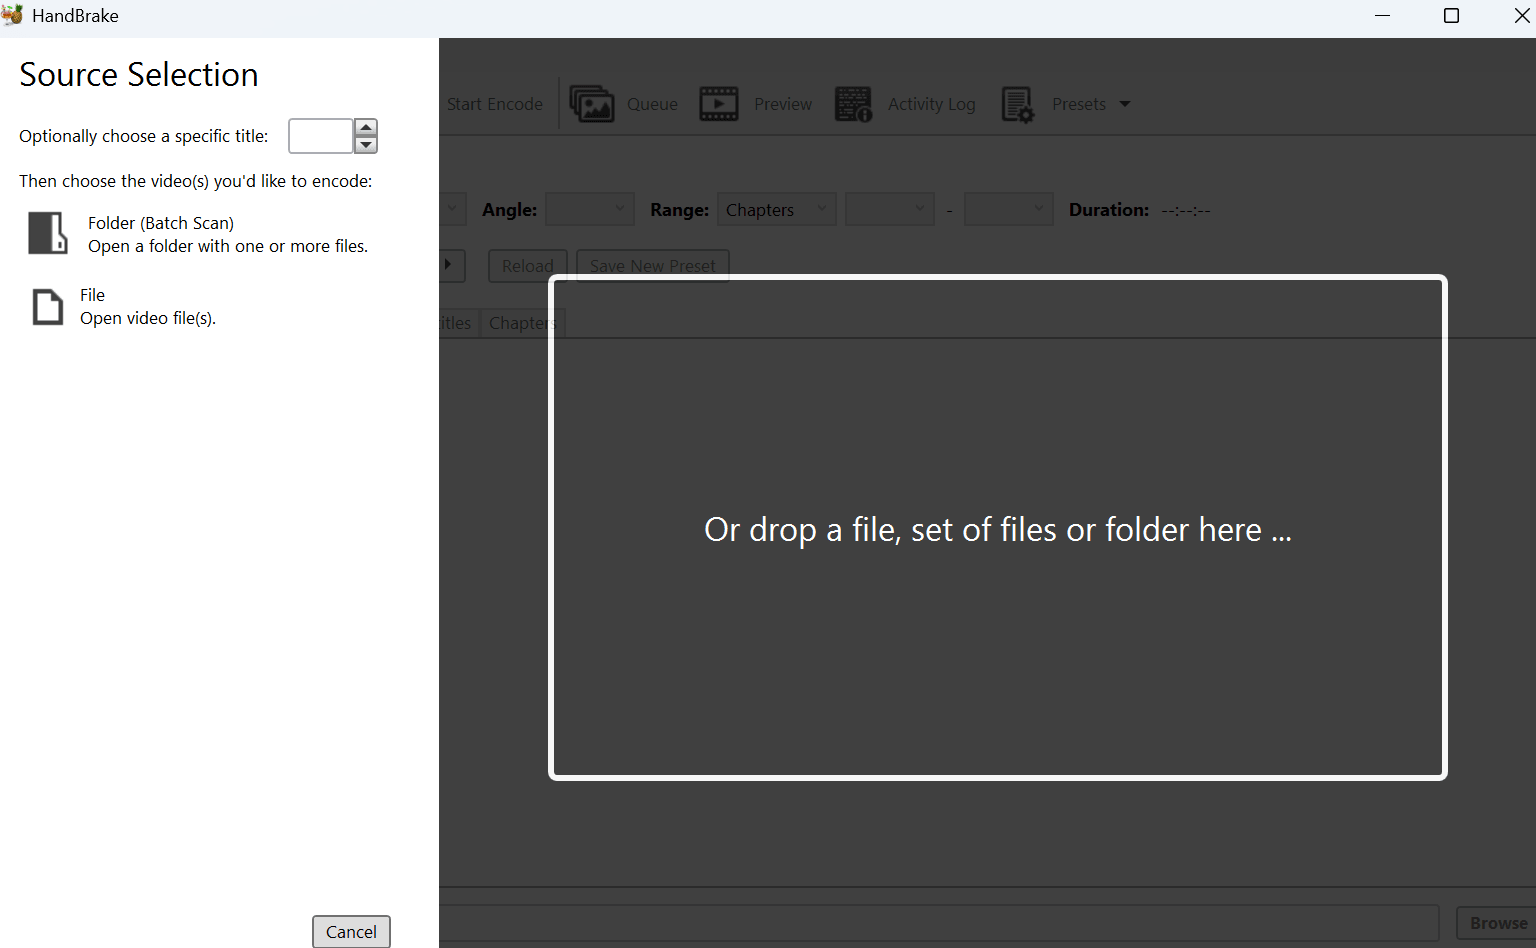
- Open HandBrake and it will ask you to open a file or folder (batch processing).
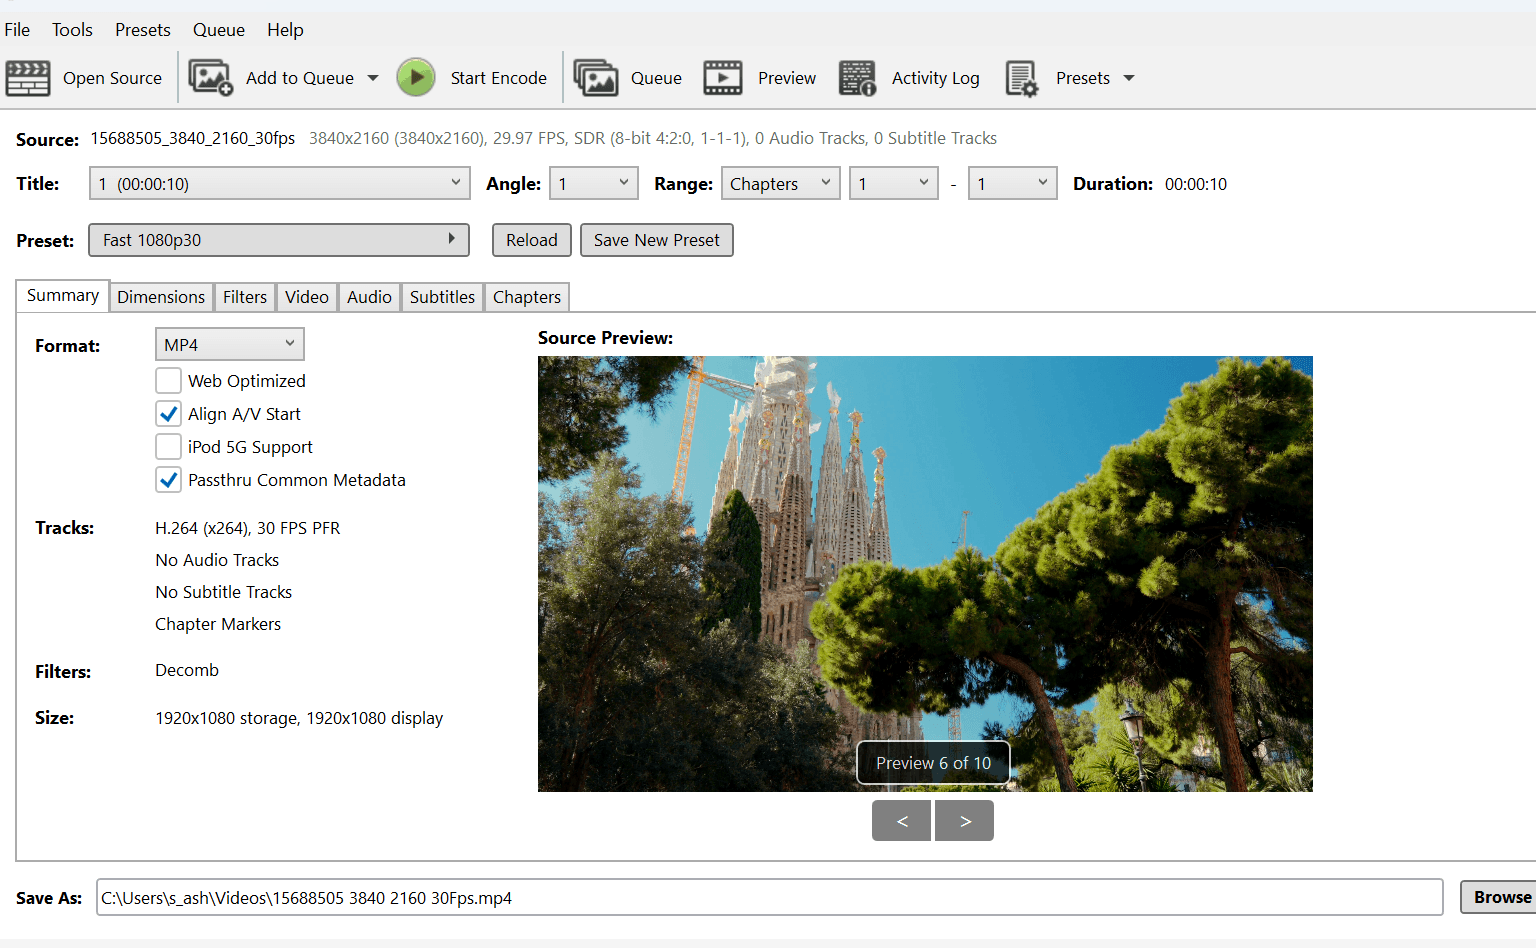
Once files(s) are opened, you will be redirected to the main software screen which is self-explanatory. There are several options which allow you to customize your media conversion experience.
- Choose Format on the Summary tab.
The ones available are MP4, MOV, MKV, and WebM.
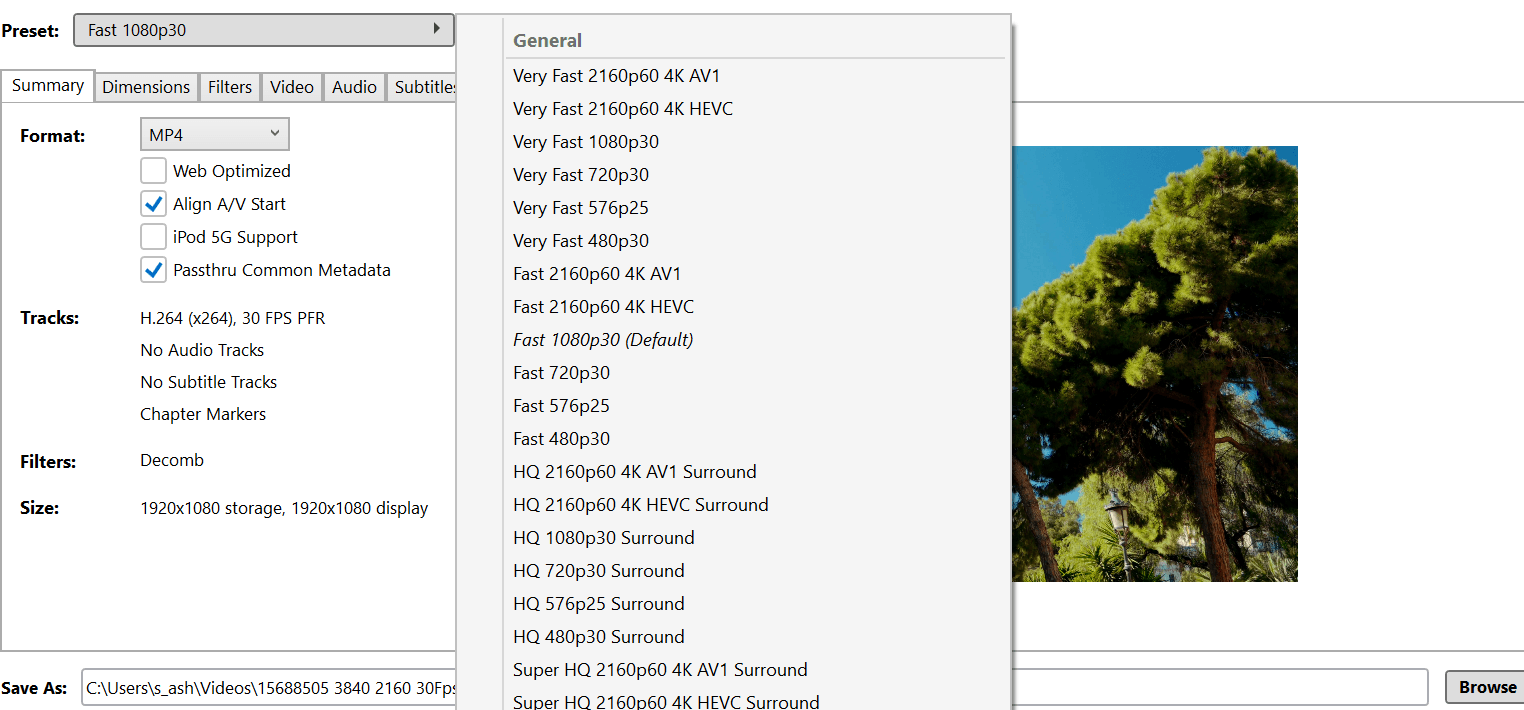
- Using Presets, choose pre-configured values.
For example, Very Fast 2160p60 4K HEVC means the video will be 4k (2160p). The frames per second are 60. HEVC is H.265 encoding. Other formats like AV1 and Surround are present on the same menu.
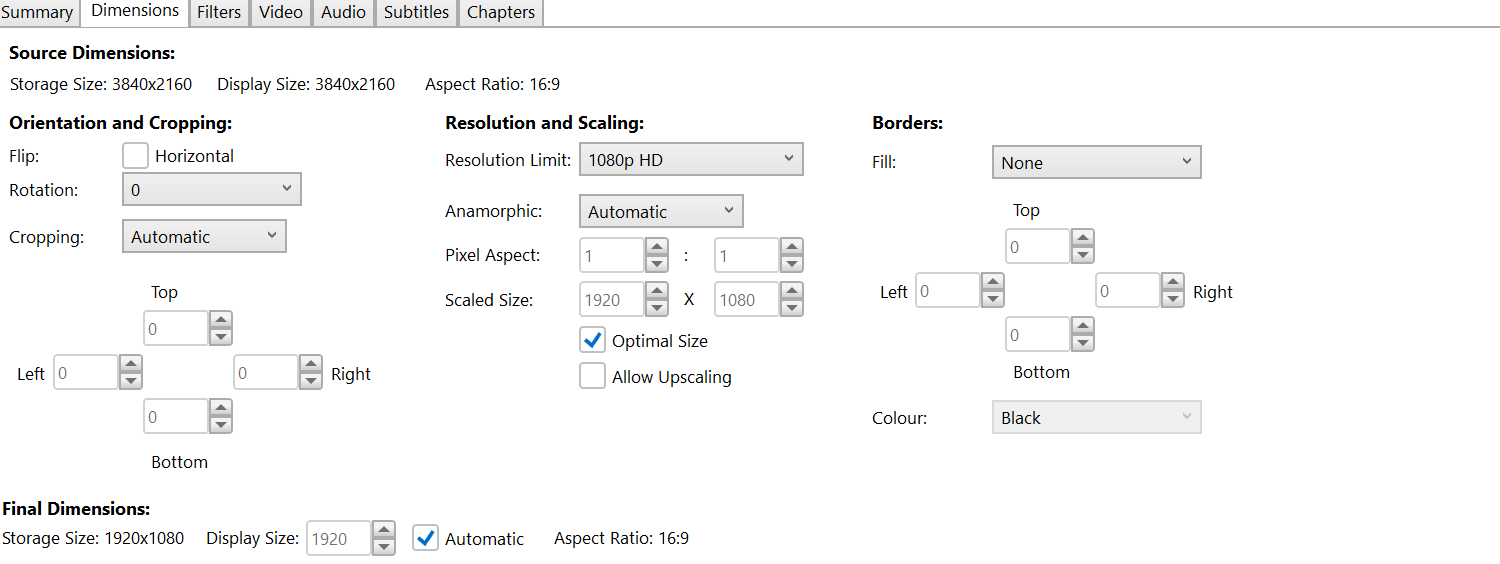
- Specify Dimensions from the Dimension Tab.
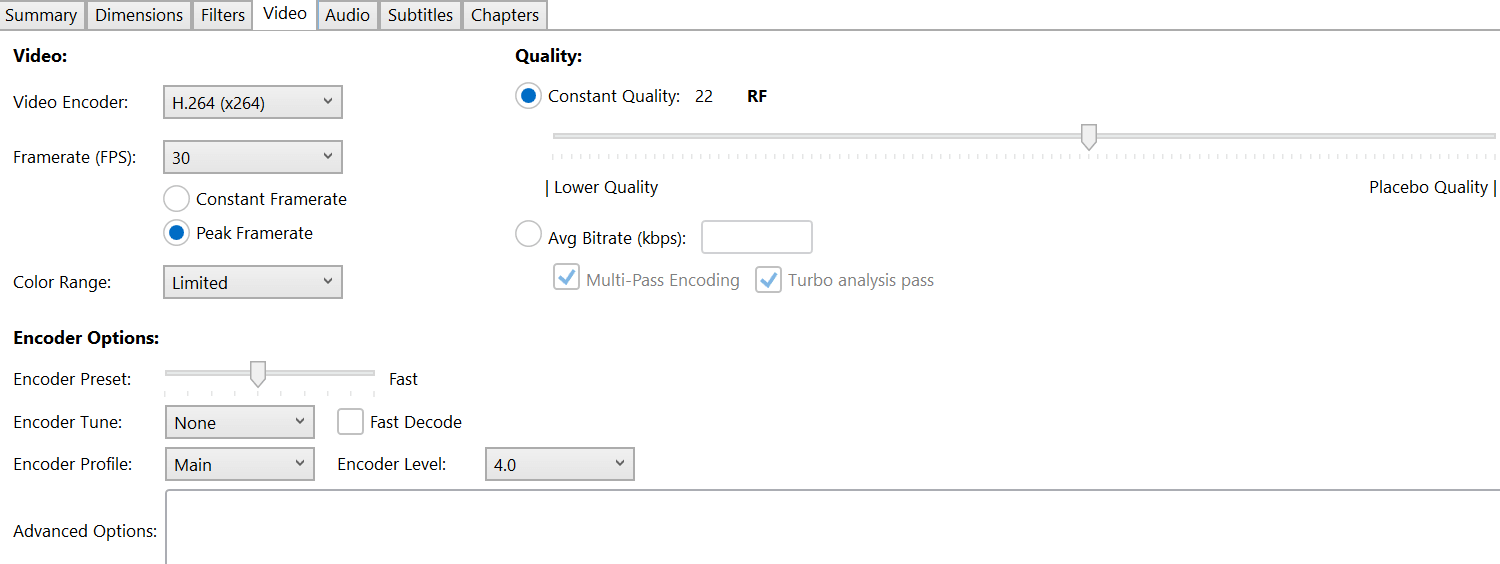
Choose the resolution and scaling dropdown to further customize your video resolution. The video tab is also useful to cherry pick the encoder, FPS, and color range. These options extend into the video editing segment. Similarly, the audio tab is for changing audio encoding and other options.
- Click the Start Encode button on the top to begin the conversion process immediately.
After choosing the basic options discussed above, you can press on the start encode button to begin the conversion process. There is also a queuing process if you want to delay the conversion which is usually done if you have a lot of videos to process. You can set all the individual options for different videos and process the queue so that you can do something else as the queue is processed.
Key Parameters to Consider in Media Formats
There are several parameters that should be considered before beginning to convert videos. You must familiarize with the terms video containers, video and audio formats/codecs. It also helps to know about bitrate and how it impacts quality of the media. Then there are also terms such as video resolution and frame rate that defines video quality.
Let us look at them one by one:
Video Container
These are the digital wrappers that encapsulates a video file. A video file is not just moving images. There’s sound that go along with it. It also metadata, subtitles and thumbnails, sometimes. So, all these wrapped all together in a single file like MP4, MKV, and AVI is known as a video container. It is used to bring together all the files necessary for a video to function normally.
Video Codec
Video Codecs are like the language of the video file (Example: H.265). Not the spoken language on it but the algorithm that compresses the video. You see, a video is several images brought together so that when the images switch from one to another, we perceive movement. A raw video would have all those images saved. A second of video can have tens of images so videos that are minutes or hours longs will have a large collection of images. If they are all saved in raw format, then they will take a vast amount of storage space.
Enter video compression and codecs. Codecs will Compress and Decompress a video. They compare each frame(image) of the video and look for ways to compress it by comparing the pixel-by-pixel differences. That means, the compressor will only save the difference between the frames. A video player will require the means to decode this compression to be able to play the video smoothly. This is how codecs work.
Frames Per Second (fps)
As mentioned before, a video is a collection of images taken at different intervals. The difference in those images is perceived as movement. How many images make up a second of video? Well, it varies. It can be 12, 24, 20, 60, 120 and so on. Higher frame rates mean the number of images that make up a second is high. Example: 60 fps means 60 images for second. The more the images in a second, the smoother the media is. But then, the more images in a second, the higher the disk space requirement. The images might be compressed with Codecs but large number of images are more likely to take up higher space in your drive.
Another thing that matters is the playback device for the media. Supposed a TV is 60hz. It means the TV can display 60 images per second. So, playing 120 fps video might not be beneficial on that television. Higher frame rates are desired mostly in video games where high-powered dedicated graphics can pump out higher frames per second.
Resolution
Resolution is the width x height of a video. An individual image is made up of multiple pixels (or points of light that produce colour). You might have heard of 4K video. Its resolution is 3840 horizontal and 2160 vertical pixels. So, there are 3840 individual points of light vertically and 2160 points of light horizontally being produced. Big screens benefit from more pixels. If a video with low pixel count is played on a larger screen, it will appear pixelated (where you can make up the tiny colored squares).
Popular resolutions are 4K (3840 x 2160), 2K (2048 x 1080), and full HD (1920 X 1080). A 4K TV will reap the most benefits of a 4K video. However, if you play the same 4K content on an 8K screen, then it might not be the best fit. Similarly, if you play 4K video on a full HD screen, it might not be able to use all those resolutions (pixel points). However, it does look good for some reason. So, what we need to understand is higher resolution means higher quality, but we need a screen that supports the resolution. Also, a high resolution will take up higher disk space, usually.
Bitrate
Bitrate is a measure of the amount of data used per second of video or audio. This term is used for both video and audio. How much detail do you want in each second of video. It is measured in MB/second (usually for video) or KB/second (usually for audio). If the bitrate is high, the picture quality will look better and if it is too low, it might appear pixelated. The same logic applies to the bitrate of audio files. If an MP3 is high bitrate, the sound is crispier and if it is low, it may sound muffled. So, higher bitrate means high quality. But that takes up more storage. It is necessary to find a balance between quality and storage space consumed.
Benefits of Converting Media Formats
When you convert from video to audio or from raw video to compressed H.265 video the main benefit is the reduction of storage requirement. When you scale down from a higher resolution video to a lower resolution video (Example: 4K to 1080p), you save space. When you reduce the frames per second, you are effectively reducing the number of pictures that make up a second of the video, so the entire file space taken up by it will go down. If you are planning to stream such a video, the bandwidth requirement for it will also go down.
Sometimes, a certain video format might not be supported by a player. You can change the codecs using HandBrake and make it compatible with your physical video player or your TV (if it plays media from the USB directly). So, video conversion can also solve issues of unsupported formats. The same goes for audio. Your wireless speakers might not support some weird raw audio format. But if you convert it to MP3 and plug it into the speakers via USB, it will be played easily.
Video codec conversion will also increase the likelihood of it being supported by different video editing software. Sometimes, the video editing software might be limited to the number of codecs it can handle. In such cases, you will have to switch the codec to a more friendly format. It will allow you to freely edit the video using your favourite editor. So, there are multiple benefits of switching media formats.
Final Words
Converting Video to MP3 and conversion between media formats has now been made easy thanks to the amazing number of mobile apps, desktop software and cloud services. A lot of these services provide all sorts of translation for free. It is quite easy and one does not have to be tech champion to do it. It’s as easy as opening the video (media), choosing the target media and going through with the conversion. All we need is the right app or software on our device. Thankfully, these are mostly free. It is nice to know about several in-between factors and terminologies that we have listed above. So, when converting between media format do it like a professional and save yourself some diskspace.
Download This Article as PDF